Showing posts with label Cheery Lynn. Show all posts

Monday, October 12, 2015

Cheery Lynn Designs Square Layers


Today I am filling in for Eva on the Cheery Lynn Design blog.  I wanted to play with my new Stitch and Cut dies and it paired beautifully with my new Square Frames.  I began with a white card stock base, 5 7/8 inches.  I cut the largest of my Square Stitch and Cut die from white card stock, mounted it onto blue and then trimmed a very small edge.  Next came the largest die in the Square Frames set from white card stock.  Love all the swirls on this die set.  Using the middle die from this set, I die cut it from blue.  To make the center white panel, I used the center die from my Royal Scandinavian Doily set.  I love how you can mix and match all the Cheery Lynn dies.


For my flowers, I cut the smallest petals from my Daisy Strip die 4 times, stacking 4 for each flower.  I shaped them with a stylus and an embossing mat.  I used my Flourish #13 die for some greenery.  The last step was to add some pearl accents.

Be sure to visit the Cheery Lynn Designs blog and join us this week for the Orange and Black challenge for a chance to win a $20 shopping spree.  

Cheery Lynn Designs dies used:
 
Be sure to visit the Cheery Lynn Designs blog and join us this week for the Black and Orange challenge for a chance to win a $20 shopping spree. 
 

Saturday, October 10, 2015

Steampunk Balloons


Here is a card I made for a friend to send to her niece who likes Steampunk.  As my friend does not like Steampunk, I kept it pretty mild.  I began with a 5 x 7 inch brown card stock base adding some great DP from Graphic 45.  Next came a border piece using my Gear Mesh Border and more DP.  I added additional Gears to both the border and the corner embellishment.


Lastly came the hot air balloons, brown card stock with more DP from Graphic 45.  I used both the Steampunk Spells paper pack and the Steampunk Debutante paper pack for this card.  

Cheery Lynn Designs dies used:


Sunday, October 4, 2015

Cheery Lynn Designs Halloween Challenge


This week the challenge at Cheery Lynn Designs is Halloween.  Using my A2 Frames Rectangular Classic die set, I created a black card base and matching DP panel.  Using my Window B die, I created my window from black card stock layering orange card stock behind the window and die cutting it again.  I created my scene on glossy card stock stippling Distress ink for the sky and grass.  I added the smallest bat from the Bat Family die set.


I popped the window up on the card base with dimensional glue dots.  Lastly I added this cute pumpkin from the Jack-O'-Lanterns set.  Finished size is 4.25 x 5.5 inches.


Cheery Lynn Designs dies used:

Be sure to visit the Cheery Lynn Designs blog and join us this week for the Anything Goes challenge for a chance to win a $20 shopping spree. 

Sunday, September 27, 2015

Cheery Lynn Designs Anything Goes Challenge


This week the challenge at Cheery Lynn Designs is Anything Goes.  I started with one of the gorgeous Card Cover Makers that Cheery Lynn is now selling.  These make A2 size card fronts.  For my card today, I have used Card Cover Maker #1, which I die cut from red mirror card.  I trimmed it out and mounted it to an A2 Cryogen Metallic card base.  I die cut my Poinsettia Strip three times from Cryogen Metallic paper then added some Spun Sugar Distress ink.  I pinched the ends of the petals then stacked them rotating so the petals alternate with each layer.

Be sure to visit the Cheery Lynn Designs blog and join us this week for the Anything Goes challenge for a chance to win a $20 shopping spree.

Sunday, September 13, 2015

Sunny Happy Birthday


Here is a card I made that is just full of texture.  I have used my Lattice Circle Frame die, but instead of cutting it, I ran it thru my machine with my rubber embossing mat to create this fun embossed circle background.  I used only Cryogen Metallic card stock for my card which is an off-white.  All of the color was added with Distress inks and finger daubers.  After mounting my embossed background to my card stock base, I die cut the middle size of my Horizon Fishtail Banners and then split it to make it longer on the card.  I used the smallest die from my Horizon French Flair Boutique Stacker Frames as a backing for my flower.


I think the Stacker Flowers quite often get overlooked, but they are great if you want a large flower.  I die cut it twice, added some ink and then rolled the petals under.  I used a stylus tool and a mat to press down in the center of the flower for more dimension.  Lastly I added some greenery using my Flourish #6 die.  Finished size is 4.25 x 5.5 inches.

Cheery Lynn Designs dies used:

Cheery Lynn Designs Things with Wings Challenge


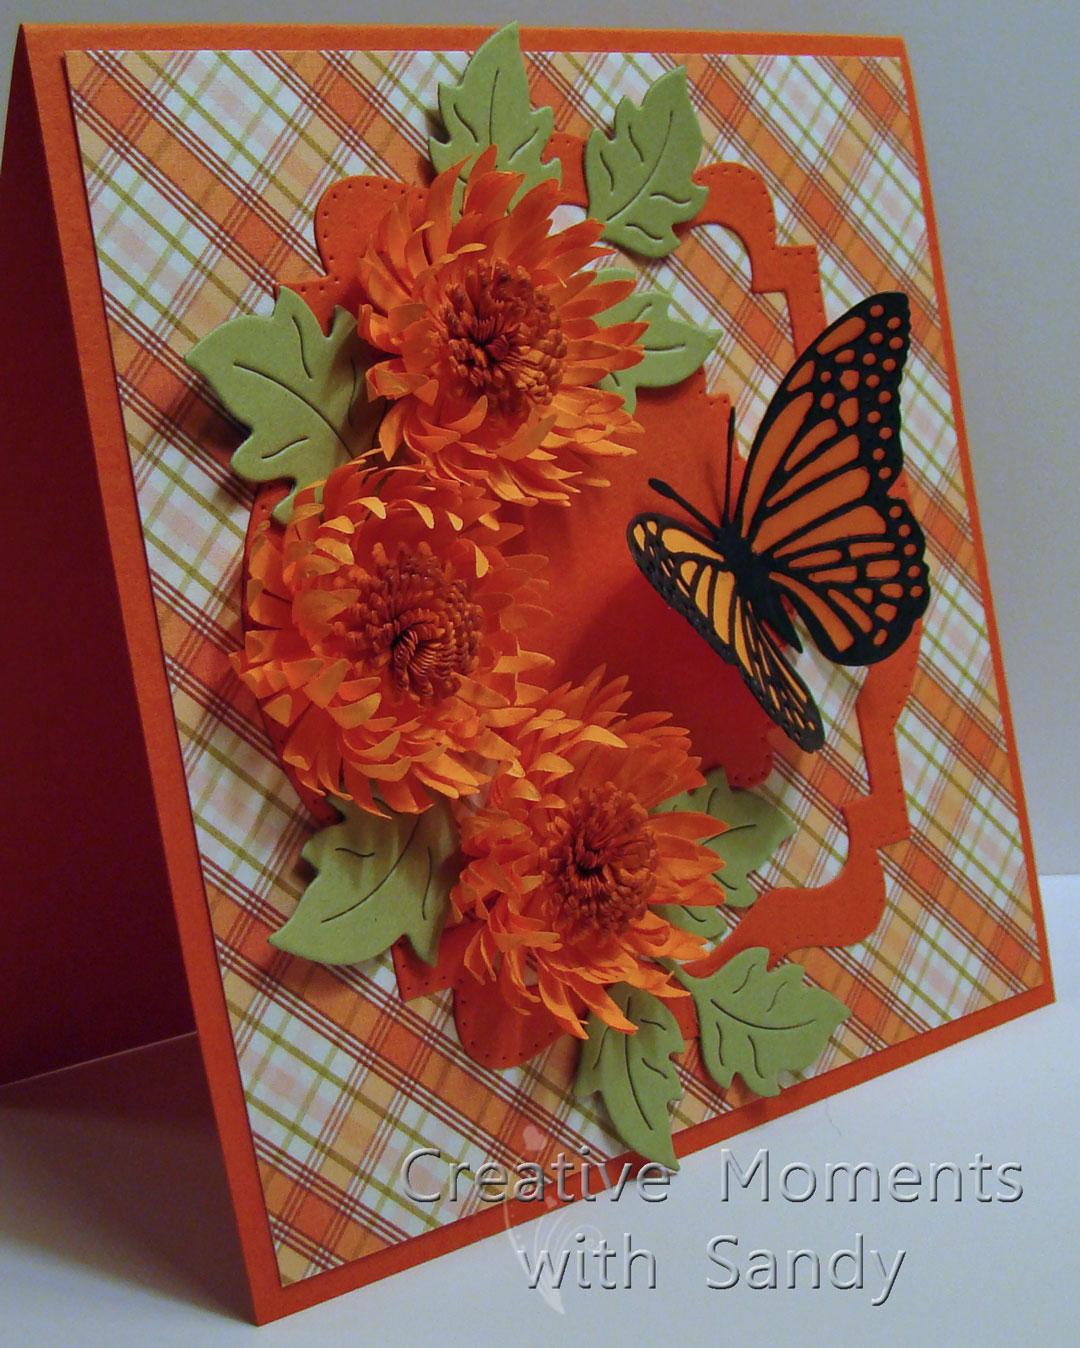
This week the challenge at Cheery Lynn Designs is Things with Wings.  I wanted to make a Fall card with some nice fat Mums.  So I used the quilling strip from my Black Eyed Susan die to make the centers, then stacked 4 petals of each size (a total of 12 petals per flower) to give them the nice full look.  I used colored printer paper and shaped them with a stylus tool.  Using my Pierced Stacker die set, I created the frame as well as the small center panel.  I added some leaves from my new Flourish #14 die set.


Lastly I added a beautiful butterfly, die cut from black card stock and backed with an orange angel wing.  Finished size is 5" square.

Be sure to visit the Cheery Lynn Designs blog and join us this week for the Things with Wings challenge for a chance to win a $20 shopping spree.

Cheery Lynn Designs dies used:

Tuesday, August 25, 2015

Cheery Lynn Designs Christmas Poinsettia Tag


Sandy filling in for Karen over at Cheery Lynn Designs.  I have made a quick Christmas Tag for my project today.  I began with a #8 tag, adding some wonderful DP from My Mind's Eye which I sponged with Vintage Photo Distress ink.  I added my Double Scalloped Border along the top and the words For You below.


To create the flower, I die cut my Rose Leaf Strip 3 times from DP adding Vintage Photo Distress ink.  I used a small circle as a base, then glued the leaves on staggering them as I went.  I pinched the petals to give it some dimension.  I added Bundled Sage to the last petals and glued them on the bottom for leaves.

Be sure to visit the Cheery Lynn Designs blog and join us this week for the Anything Goes challenge for a chance to win a $20 shopping spree.  

Cheery Lynn Designs dies used:

Sunday, August 23, 2015

Cheery Lynn Designs Anything Goes


The challenge this week at Cheery Lynn Designs is Anything Goes.  I just purchased the newly released French Flair Stitch and Cut Silver Stackers and wanted to try them out.  They not only cut out the great French Flair shape, but they also add a wonderful stitch line just inside the outer edge.  A very classy touch to an elegant design.  I paired them up with the matching French Flair Stackers and the French Flair Doily Stackers. 


I added a simple Chrysanthemum flower and leaves using Flourish #13.  Finished size is 5 5/8" square. 

Be sure to visit the Cheery Lynn Designs blog and join us this week for the Anything Goes challenge for a chance to win a $20 shopping spree.  


Cheery Lynn Designs dies used:

Sunday, August 9, 2015

Cheery Lynn Designs Back to Nature


The challenge this week at Cheery Lynn Designs is Back to Nature.  I began my card with my Scalloped French Flair Stackers adding a DP panel with my coordinating Silver French Flair Stackers.  Next using my Circle Stackers and Silver Circle Stackers I created a frame for my French Lattice Small.  I used dimensional foam to mount this to the card.


Using text weight metallic yellow paper, I die cut three sets from my Shasta Daisy Strip.  I curled the ends of the petals, dry embossed the center and then stacked the petals to create my flowers.  Lastly came my Dragonfly.  Finished size is 5.5 inches square.

Be sure to visit the Cheery Lynn Designs blog and join us this week for the Back to Nature challenge for a chance to win a $20 shopping spree.  

Cheery Lynn Designs Dies Used:

Sunday, August 2, 2015

Cheery Lynn Designs Summer Fun Challenge


The challenge this week at Cheery Lynn Designs is Summer Fun.  Here in Michigan summer means Hot Air Balloon Festivals and fresh produce.  My neighbor has been giving me lots of zucchini so I have been making bread and needed a tag to go with one for a gift.  So I grabbed my dies and a blank tag and came up with this.  I started by adding Broken China Distess ink to a white tag, then I spritzed it with water.  Next I added the Garden Gate and a small piece from the Victorian Picket Fence along the bottom.  I die cut them out of Coredinations paper so they have great texture.  Next came the newly released Grass Border 2.  I cut it from Cryogen white card stock and then colored it with Copics.  Next up with the clouds, I added a bit of blue shading along the bottom for some interest. I die cut my hot air balloon again from Cryogen white.  I ran the die back thru the machine on another piece of Cryogen and embossed it with my rubber mat.  This makes a wonderful backing for the balloon that is easily hand trimmed and then colored.  It pops right into the die.  I used dimensional foam to mount the balloon.


Lastly came the sentiment, I trimmed the oval from my Paris Sign #1, stamped a sentiment and then added some color.  This was mounted with dimensional foam as well.

Be sure to visit the Cheery Lynn Designs blog and join us this week for the Summer Fun challenge for a chance to win a $20 shopping spree.  

Cheery Lynn Designs Dies used:

Wednesday, July 29, 2015

Heartfelt Creations Blue Poinsettia


I recently purchased some of the new Heartfelt Creations Sparkling Poinsettia stamps and dies.  I saw a card that Kathy Roney from their design team created and decided to try my hand at it.  I just happened to have the same inks that she used: VersaMagic Aegean Blue and Tea Leaves.  I used the Sparkling Poinsettia Cling Stamp set and the coordinating Sparkling Poinsettia dies.  I stamped twice with VersaMark onto Beckett Radiance White card stock and then added Piccolo Aged White embossing powder.  This is a wonderful mix of white chunky embossing powder with flecks of gold.  Be sure to click on the photo for a closer look!  Then I die cut them out.  I used a stipple brush to add Aegean Blue ink to the flowers.  I swirled the color around the center of the petals; moving the brush out towards the ends to create a nice soft graduated color.  I stacked the petals to create 3 sizes of flowers.  Lastly I added white pearl beads for the centers.


My card began with a 6 x 6 black card stock base.  To that I added a piece of DP from the Heartfelt Creations Celebrate the Journey paper pack.  I also used one of the frames from the same paper pack adding a black card stock backing.  I arranged the flowers around the frame and then added greenery from the Open Leaf Cling Stamp set; die cut with the coordinating Open Leaf set and colored with Tea Leaves ink.   The words are from my Cheery Lynn Designs Joy to the World Wreath.  The last step was to add some silver Peel-Off stickers around the edge of the card.  It needed that last little something! 

Sunday, July 26, 2015

Cheery Lynn Designs Anything Goes Challenge


The challenge this week at Cheery Lynn Designs is Anything Goes.  I have used some more of this month's new release dies.  Everyone knows I love making Halloween cards and this one came together very nicely.  Other than the fence, I die cut everything from Curious Cryogen metallic paper and colored them with Copic markers.  I added a wonderful piece of starry sky paper to my 6" square black card base.  Next using green card stock, I created a rolling hill for my haunted house.  I die cut my fabulous Home Sweet Home and colored it up with spooky shades of blue/violet.  I added yellow card stock to the back to look like lights are on.  Next came my Victorian Picket Fence die cut from black card stock.  In front of this I added two of the pumpkins from the Jack-O'-Lanterns set of 3.  I used black card stock on the back of these.  My Horrible Cat was next, I used green card stock for his eyes and pink for his nose.  I colored him a dark gray so he would show up against the fence.  Using my Circle Stackers I die cut a moon and then embossed it with my Cheetah Grunge Embossing Plate.  Doesn't it look like craters on the moon?  I added some purple shading with my Copic pens.  Next came the new Trick or Treat, love this big drippy font!  Again, colored with Copic markers.  And as a last embellishment, I added a couple of bats from the new Bat Family die.  I am really pleased with the way this turned out.  I hope you like it as well.

Be sure to visit the Cheery Lynn Designs blog and join us this week for the Anything Goes challenge for a chance to win a $20 shopping spree. 

Cheery Lynn Designs dies used:

Sunday, July 19, 2015

Cheery Lynn Designs Silver and Gold Challenge


The challenge this week at Cheery Lynn Designs is Silver and/or Gold.  You can use one or both.  I have used silver mirror card and gold beads.  I began with a red card base 5 inches square.  To that I added a white panel 4 13/16 inches square.  (Yes, I used 1/16 inch increments; 1/4 is too large, 1/8 is too small and 3/16 is just right for a border)  Next I cut my gorgeous Snowflake Wonder Doily from white card stock.  I used only the outer die of this 2 piece set.  Next I used the newly released Doily Companion Square die set to cut a red backer for my doily as well as a perfectly sized red square for the center of my doily.  

 
Using silver mirror card, I die cut the new 3-D Poinsettia and mounted it into the center of my doily.  Just look at all that beautiful detail.  I bent the inner petals up for the 3D effect.  Then I added some gold embellishments to the center of my poinsettia.  Using my silver mirror card, which is adhesive backed, I die cut some strips using the medium ones on my Expandable Quilling Strip Die.  I miter cut the corners for a clean look.

Be sure to visit the Cheery Lynn Designs blog and join us this week for the Silver and/or Gold challenge for a chance to win a $20 shopping spree. 
Cheery Lynn Designs dies used:

Wednesday, July 15, 2015

Cheery Lynn Designs July 2015 New Release


Today is new release day at Cheery Lynn Designs.  The design team has come up with some wonderful projects using the new dies.  I have created a card using two new sets:


I began with a card base 6 inches square and added some holiday paper.  I trimmed the green panel on the bottom to create a hill for my house to sit on.  I die cut everything from Cryogen Metallic paper and colored with my Copic Markers.  I added accents to the Gingerbread House using Piccolo 3D Enamel Gels.  They have a wonderful shiny finish.  


For my Gingerbread kids, I used my Sakura White Glaze pen for the icing accents on their arms and legs and Sparkly Fluff for the hats.  I added my Victorian Picket Fence behind the kids.  Lastly I used my Paris Signs #3, trimming off only the sign and then stamping Sweet Stamps Happy Holidays.  The sign and the Gingerbread Kids were popped up with dimensional foam. 

Be sure to visit the Cheery Lynn Designs blog for more inspiration with the new dies.  And join us this week for the White on White challenge for a chance to win a $20 shopping spree. 

Sunday, July 12, 2015

Cheery Lynn Designs White on White Challenge


The challenge this week at Cheery Lynn Designs is White on White.  You can use color on an image, but not on the actual card.  I love making WOW cards; they are very quick especially if you use Cheery Lynn Stackers and Doilies.  I began with the largest die from my Heart Edge Square die set, then cut a card base that was 5 1/8" square and mounted it to the back.  I wanted the hearts around the edge to show.  Using the next die down in my Heart Edge set, I cut another panel and popped this one up with dimensional form.  I centered my gorgeous Dutch Daisy Square Doily on this panel, adhering it with spray adhesive.


I cut a 2 1/8" square and embossed it with my Dotted Swiss Embossing plate and then popped that up on my square doily with dimensional foam.  Lastly, I cut my Thank You #2 twice, glued them together and then added it to my center panel.  

Be sure to visit the Cheery Lynn Designs blog for more inspiration and to enter the challenge for a chance to win $20 towards shopping at Cheery Lynn.

Cheery Lynn Designs dies used:

Sunday, July 5, 2015

Cheery Lynn Designs In Stitches Challenge


The challenge this week at Cheery Lynn Designs is In Stitches (real or faux).  I have used the beautiful Lords & Common dies which work wonderful with embroidery floss.  I only added a few cross stitches, but you can add lots should you desire.  I began with an A2 card base; 4.25 x 5.5 inches.  I added 3 layers from the Lords & Commons Boutique Stacker A2 Frames using dimensional foam between layers.  I added the center from the coordinating Lords & Commons Doily as my center focal point.  I used 3 strands of embroidery thread to add my cross stitches.  I popped this center circle up as well.


I added two of the smallest flowers from my Poinsettia Strip and two small Holly Leaves.  And lastly added some red Stickles accents.
Be sure to visit the Cheery Lynn Designs blog for more inspiration and to enter the challenge for a chance to win $20 towards shopping at Cheery Lynn.

Cheery Lynn Designs dies used:

Sunday, June 28, 2015

Cheery Lynn Designs Christmas in July Challenge


The challenge this week at Cheery Lynn Designs is Christmas in July.  I still had my Kraft card stock out so I decided to make a Krafty Christmas card.  I think the red and Kraft is a nice combination.  I began with a Kraft card base, 4.25 x 5.5 inches.  To this I added the largest die from my Dutch Daisy Boutique Stacker set, die cut from Kraft card stock.  Using my coordinating Scalloped Rectangle A2 Frame die set, I cut a red panel to fit the center of my Dutch Daisy frame.  Next came the beautiful Lords & Commons Oval Doily, again cut from Kraft card stock.  For the center of this panel, I used my Silver Oval Stackers to cut a coordinating red oval panel. 

 
To create my flowers, I die cut my Poinsettia Strip in both Kraft and red card stock, alternating the colors as I layered the petals.  To shape them, I simple pinched the petals together, easy peasy!  The last step was to add Merry Christmas, this die comes with a tree above the "T" but I trimmed that off.  I used dimensional foam between the card stock base and the rectangle frame and also between the oval frame and the red rectangle.  

Be sure to visit the Cheery Lynn Designs blog for more inspiration and to enter the challenge for a chance to win $20 towards shopping at Cheery Lynn.

Cheery Lynn Designs dies used:

Monday, June 22, 2015

Cheery Lynn Designs Daisies and Butterfly


I filled in for Eva today over at Cheery Lynn Designs.  I have another floral card for you, this time showcasing my Daisy Strip die.  I die cut the Daisies twice out of white card stock and then added color with my Copic markers. Next, using a Stylus tool, I shaped the petals from the back side.  I layered 2 large and 2 small for the center flower and then 2 medium and 1 small for the other two flowers.  I added a bit of Spiced Marmalade Stickles to the center of each. 


I began with a 5 x 7 inch green card stock base, adding a DP panel 4.75 x 6.75 inches.  Using green card stock, I die cut my Tiny Bubbles border as well as two Double Scalloped Borders.  I used Spray Adhesive to attach them to my card.  I used my Rose Leaf Strip and both of the Mini Fanciful Flourishes for some greenery.  Using one of the butterflies from my Small Exotic Butterflies #2 w/ Angel Wings set, I created this beautiful butterfly.  I used white card stock and added color to the butterfly as well as the leaves.  

Be sure to visit the Cheery Lynn Designs blog for more inspiration and to enter the Anything Goes challenge for a chance to win $20 towards shopping at Cheery Lynn.
 
Cheery Lynn Designs dies used:
 

Sunday, June 21, 2015

Cheery Lynn Designs Anything Goes Challenge


The challenge today at Cheery Lynn Designs is Anything Goes.  My card begins with my Chicken Wire Frame die cut from white and mounted on a blue card stock base.  Next I die cut my Mirror Mirror Doily, adding a purple panel behind the inside row of die cut dots.  Then I added the smaller of the Celebrate die set.


 I used my Chrysanthemum Strip to create the flowers.  I added the newly released Leafy Flourish, layering some small floral centers from my Tiny Flower Kit.  I added some green Stickles to the center of the flowers.  Everything was cut from white card stock and color was added with Copic markers. 

Be sure to visit the Cheery Lynn Designs blog for more inspiration and to enter the challenge for a chance to win $20 towards shopping at Cheery Lynn.

Cheery Lynn Designs dies used:

Sunday, June 14, 2015

Cheery Lynn Designs Keep It Krafty


The challenge this week at Cheery Lynn Designs is to use Kraft paper.  I began with a Kraft card base 5.5 inches square.  I dry embossed a 5.25 inch square Kraft panel with my Daisy Garden embossing plate.  I used Frayed Burlap Distress ink to accent the embossed areas.  Next came the largest of the new Pierced Stacker #3 set.  To the center of that, I added an Ambergris Doily.  Behind the Thank You, I layered a Silver Circle Stacker on top, then an Inverted Scalloped Stacker and a matching Circle Stacker on the bottom.   


I die cut my Margarita Border from Kraft paper and layered that onto a Blue Kraft card stock.  I paired my Sweet Williams die with tiny flower centers from my Tiny Flower Kit to created the flowers.  And then added Thank You, cut twice from Kraft, one was distressed and then layered. 

Be sure to visit the Cheery Lynn Designs blog for more inspiration and to enter the challenge for a chance to win $20 towards shopping at Cheery Lynn.

Cheery Lynn Designs dies used: