Monday, January 30, 2012

Cheery Lynn Designs Challenge 13 - Sweethearts


The challenge this week at Cheery Lynn Designs blog is Sweethearts.  On the bottom panel of my card I used Antique Linen Distress ink directly on the Hearts and Leaves embossing plate before embossing to give a more vintage feel.  This meant that I used the debossed side of the paper.  The top panel I embossed Petite Hearts so the hearts are raised.   The border across the center is the new Queen Anne's Lace.  After die cutting the Celtic Heart, I debossed the center fall out the same way I did the bottom panel.  I popped it up on the card for some dimension. Using Miniature Rose, Medium Rose and Large Rose to create my rose, I then added a bit of Carmel Creative Inspirations Paint to give it a warm tint and more sparkle.  I was going for a very vintage mono-chromatic look.  I think it is kind of classy!  Finished size is 5.5" square.

Be sure to check out the challenge for a chance to win a $20 coupon for shopping at the Cheery Lynn website.

Tuesday, January 24, 2012

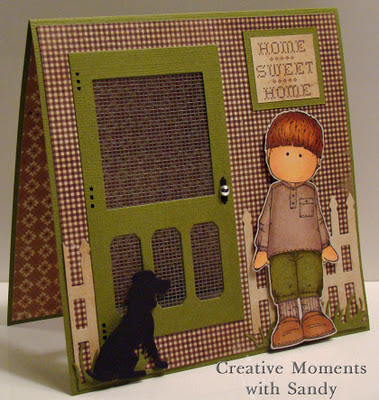
Home Sweet Home


The challenge over at Just Magnolia and Hanglar & Stanglar is to use a door or window on your card.  Well this gave me the perfect opportunity to use my new Cheery Lynn Designs Screen Door w/dog.  Dog, you say!!??; thought it was a Cat.  They slipped in a second version for all those dog lovers out there.  And being the owner of both a dog and a cat, of course I had to have both styles, lol.  I began with a square card base to which I added a piece of gingham paper from the Generations 6x6 paper pack by Simple Stories.  Next I die cut my door out of the same card stock as the card base.  I laid the door on my card stock and traced around it; then cut inside the lines by about 1/8th of an inch.  I added the screen to my door (the die comes with 2 pieces of screen) then attached it to the front of the card.  I die cut another door from the wrong side of my card stock and adhered it to the inside of the card.  I added another piece of patterned card stock from the paper pack to the inside of the card. 


Using black card stock, I die cut the dog as well as the hardware on the door.  Using more paper from the Generations collection, I die cut Cheery Lynn's Victorian Picket Fence, adding part to each side of the door.  I also placed a bit of Cheery Lynn's Grass Border at the base of the fence.  The Home Sweet Home is from one of the papers in the pack, I just trimmed out the words.  I stamped this adorable Hanglar boy with Memento Tuxedo black ink onto Cryogen paper.  Copics used:
Boy - E000, E11, R20
Hair - E21, E23, E25
Shirt and Socks - E70, E71, E74
Pants - YG93, YG95, YG97
Shoes - E23, E25
Shadow - W1
I added a silver gem for the door knob, a bit of black Glaze pen for nails on the door and that was it.  Finished size is 6" square.

Monday, January 23, 2012

Cheery Lynn Designs Challenge 12 - Dry Embossing


This week's challenge at Cheery Lynn Designs is Dry Embossing.  Cheery Lynn Designs has a wonderful assortment of embossing plates and grunge plates available.   For my card, I began with a base of Violette Curious Metallic card stock die cut using my  Scalloped Oval Lg Stacker.  I added an Cryogen metallic layer embossed with my Hearts and Rose Leaves embossing plate.  The great thing about these plates is their size.  They are a whopping 5 5/8 x 7 3/4 " so you can easily emboss a 5 x 7 card or even a panel for a 6" square card.  Next came the center layers, first the Violette Scalloped Circle Large Stacker and then the Cryogen  Circle Silver Stacker embossed with my Flutter Bys embossing plate.   


On to the flowers, aren't they just gorgeous. I love being able to create such beauties using dies and not having to add pre-made flowers and hope the colors match.  I began with the center Violette rose, this time using text weight metallic paper.  I layered petals from Miniature Rose, Medium Rose,  and Large Rose dies for this one; dry embossing from the back so the petals are softly curved. For the Amethyst roses, I used Miniature Rose and Medium Rose.   Next came the two tone roses, I was inspired by the roses on Bonnie B's challenge entry a few weeks ago, I love the use of two papers.  For these roses, I used Cuties 2, just glueing half of each die cut together as shown in my tutorial.  For the final roses, I used Cuties 3, solid colors this time.  I tucked in some leaves from Dimensional Large Leaves 2 as well as a bit of leaf and swirl from Fanciful Flourish.  The last step was to add two butterflies from the Exotic Butterfly Small die set. I added a few beads of Lilac Viva Decor Pearl pen to their bodies. Finished size is 5 x 7 inches. 

Be sure to check out the challenge for a chance to win a $20 coupon for shopping at the Cheery Lynn website. We also have a second sponsor, CutCardStock, they are donating a $30 shopping spree to their store. 

Friday, January 20, 2012

Valentines with Tilda and Cheery Lynn


Here is a cute card I made with Tilda with Christmas Baked from the Sweet Christmas Dreams collection.  The baked cookies are hearts so she is perfect for a Valentines card.  I stamped Tilda with Memento Tuxedo black ink onto Cryogen paper.
Copics used:
Tilda - E000, E00, E01
Hair - YR21, YR23
Dress, Bow and Socks - RV21, RV23
Hearts - R46
Basket - E23
Cloth - RV21
Boots - E42, E43


I used my Cheery Lynn Designs Scandinavian Hearts frame to showcase Tilda.   To create the white background panel, I embossed my card stock with Cheery Lynn's Hearts and Rose Leaves XL embossing plate.  I created the roses using the Miniature Rose, Medium Rose and Large Rose dies.  I added a couple of Olive Branches to finish it off.


For the inside of the card, I used my Cheery Lynn Lace Edger.  Notice it is the same pattern as the frame, but this is an edger.  It does not cut a border piece, rather just adds the decorative cut along the edge of your card stock.  Finished size is 6" square.

Challenges:
Magnolia-licious Highlights - Valentines

Wednesday, January 18, 2012

Koala HugTilda


When I saw this adorable limited edition Koala Hug Tilda from Magnolia stamps, I knew she would pair up perfectly with my Cheery Lynn Designs Aussie Kangaroo Doily.  How cute are they together?  When I die cut the doily I got these adorable little kangaroo drop outs which I used to make the border across the bottom.  I die cut the doily twice, once out of Kraft paper and once out of the DP.  Then mounted them on top of each other to make the doily a little more substantial and then inserted the Kraft kangaroos back into the doily. I stamped Tilda with Memento Tuxedo black onto Cryogen paper. 
Copics used:
Tilda - E000, E00, E11, R20
Hair - E23, E25, E27
Dress and Hatband - YG91, YG93 (after I colored her and then searched for paper, I realized the greens I chose were too gray so I added Y04 on top to give them more of a yellow cast)
Hat and Boots - E41, E42, E43
Koala - W00, W1, W3


To finish the inside of the card, I added the newly released Francesca border and the last two drop out kangaroos.  The DP is from the Basic Grey Green at Heart 6x6 pad.  Finished size is 6" square.

Monday, January 16, 2012

Cheery Lynn Designs Snowflakes

Well, we finally got some snow this week in Michigan, yeah!  So this week's challenge at Cheery Lynn Designs is perfect..............

Snowflakes

Cheery Lynn Designs has a wonderful assortment of snowflakes available.


For my card, I layered Snowflake 7 on top of Snowflake 4, using pop dots for lots of dimension.  I also used the gorgeous  Snowflake Flurries XL embossing plate for my background.  I embossed Core'dinations color-core paper and then sanded the raised embossing so the core color shows through.  The frames is the newly released Dutch Doily Rectangle Frame, the image is called Winter Fairy from Whimsy stamps.  I stamped her with Memento Tuxedo black ink, then colored her with Copics.  I added Sparkly Fluff to her coat, boots and earmuffs.  Finished size is 5 x 7 inches.

Be sure to check out the challenge for a chance to win a $20 coupon for shopping at the Cheery Lynn website.
Sunday, January 15, 2012

Craft a Scene Design Team


This is a very quick Photoscape I created using Stampscapes Lakeside Cabin.  This stamp is the reason I became a scenic stamper.  I printed my sky on to Staples Photo Plus paper, then stamped my scene using Marvy Matchable Black ink.  I added a bit of color to the cabin with a Tombow marker.  Finished size is 4.25 x 5.5 inches.

I am quite excited to announce that I have been invited to join the new Craft A Scene design team.  I have always loved scenic stamping and now I will have a reason to get those stamps inky each month.  I hope you will join us in the monthly challenges.  It will be great fun!

Cheery Lynn Designs January New Release

Cheery Lynn Designs is releasing some fabulous new dies today.  Be sure to visit the design team blog to see what the rest of the ladies have created for you; some pretty awesome stuff!!


For my first card, I used the new French Lattice small frame that I adhered to a white background which I first embossed with my Petite Hearts XL Embossing plate.  To fit my A6 size card, I cut the lattice across the center and added the new Country Girl border in the opening.  I used the new Cuties 4 to create the red flower below my pink rose, which was created with my Large Rose die.  The finishing touches are the Tropical Flourish and the lovely Celtic Heart.


For my second card, I created a center step card to highlight the new Swedish Spring Oval die.  I love this die and it cuts so easily!   I created the rose using my Cuties 3 die layering it on top of Cherry Blossoms.  I added Flower Chain Border on each side and then used one of the flowers as a slider on my ribbon.   The adorable image is from Whimsy Stamps, she is called Wee Florist.


I finished the inside of the card using the same dies as on the face of the card.  Finished size is 6" square. 

Don't forget that today is the last day to enter this week's Beautiful Borders challenge for a chance to win a $20 shopping spree at Cheery Lynn Designs.

Tuesday, January 10, 2012

Cheery Lynn Designs Cuties

I have had several people ask me how I use the Cheery Lynn Designs Cutie dies so I thought I would do a picture tutorial.  But first, here is a card I created; all 3 of the roses were done with Cutie dies.


Most important for creating roses is the paper you use.  I like to use text weight paper, in particular metallic because I love the shimmer.  I get mine from CutCardStock.com  You can also use light weight card stock, the lighter the better.

Step 1: Die cut your Cutie, cut it in half then glue the halves together; right sides up staggering the petals.  Be sure to keep your glue only on the bottom edge; you don't want any glue on your petals.  It should look like this.  Notice there is only one layer of paper on the right hand side, this is important.  Let dry thoroughly (very important)


Step 2:  Slide a quilling tool up the center of the first petal on the right.  The good side of the die cut is still facing up


Step 3:  Use you finger nail to wrap the end of the paper around the quilling tool and start rolling the flower up; you are rolling to the left or towards you so the good side of the die cut is on the inside.  If your bottom edge starts to buckle, you did not let the glue dry enough. Watch the petals as you roll; tuck the edges under as you go and try to keep the bottom even.  If it starts to walk down the quilling tool, just use your finger nail to push it back even.  When you get to the end, just add a bit of glue to secure the end.  Do not get glue on the petals, only on the bottom edge. 


Top view of a rolled Cutie


Side view of a rolled Cutie.  I add a bit of glue on the flat bottom just to prevent it from telescoping out.


Step 4:  Start peeling the petals down, working slowly around the flower.  As you work, you can add some curl to the petals as you go but that is optional.  And here is what the finished flower should look like.  I used Cuties 2 in this example.


I prefer to work with just half a die when rolling; it keeps the base of the flower small enough to work with.  I used Cheery Lynn Designs Cherry Blossoms under the Cuties on my card.  I also used Olive Branches, Scandinavian Heart frame and Scallop Circle XL Stackers to complete the card.  The adorable image is from Whimsy Stamps.  Finished size is 6" square.  If you need help with any of the dies from Cheery Lynn Designs feel free to contact me.

Monday, January 9, 2012

Cheery Lynn Designs Beautiful Borders challenge


I know many people in the States are wishing for Spring (not me, I love snow)  But here is a Spring themed card I did for this week's Cheery Lynn Designs  Beautiful Borders challenge.  I began with Japanese Lace Pattern frame, but instead of die cutting it, I embossed the detail as a background for my flowers.  I arranged my Olive Branches and then added flowers created with the new Miniature Rose die.  The white border is the fabulous Ribbon Eyelet Border with Piercings. I threaded a piece of yellow card stock through the border but first I added textured with my Rectangle Stitcher Plate.  I think it makes it look like woven ribbon.  The finishing touch was adding the green Anastasia Border across the bottom.   It is such an elegant border.  I computer generated the saying.  Finished size is 6" square.

Be sure to check out the challenge for a chance to win a $20 coupon for shopping at the Cheery Lynn website.